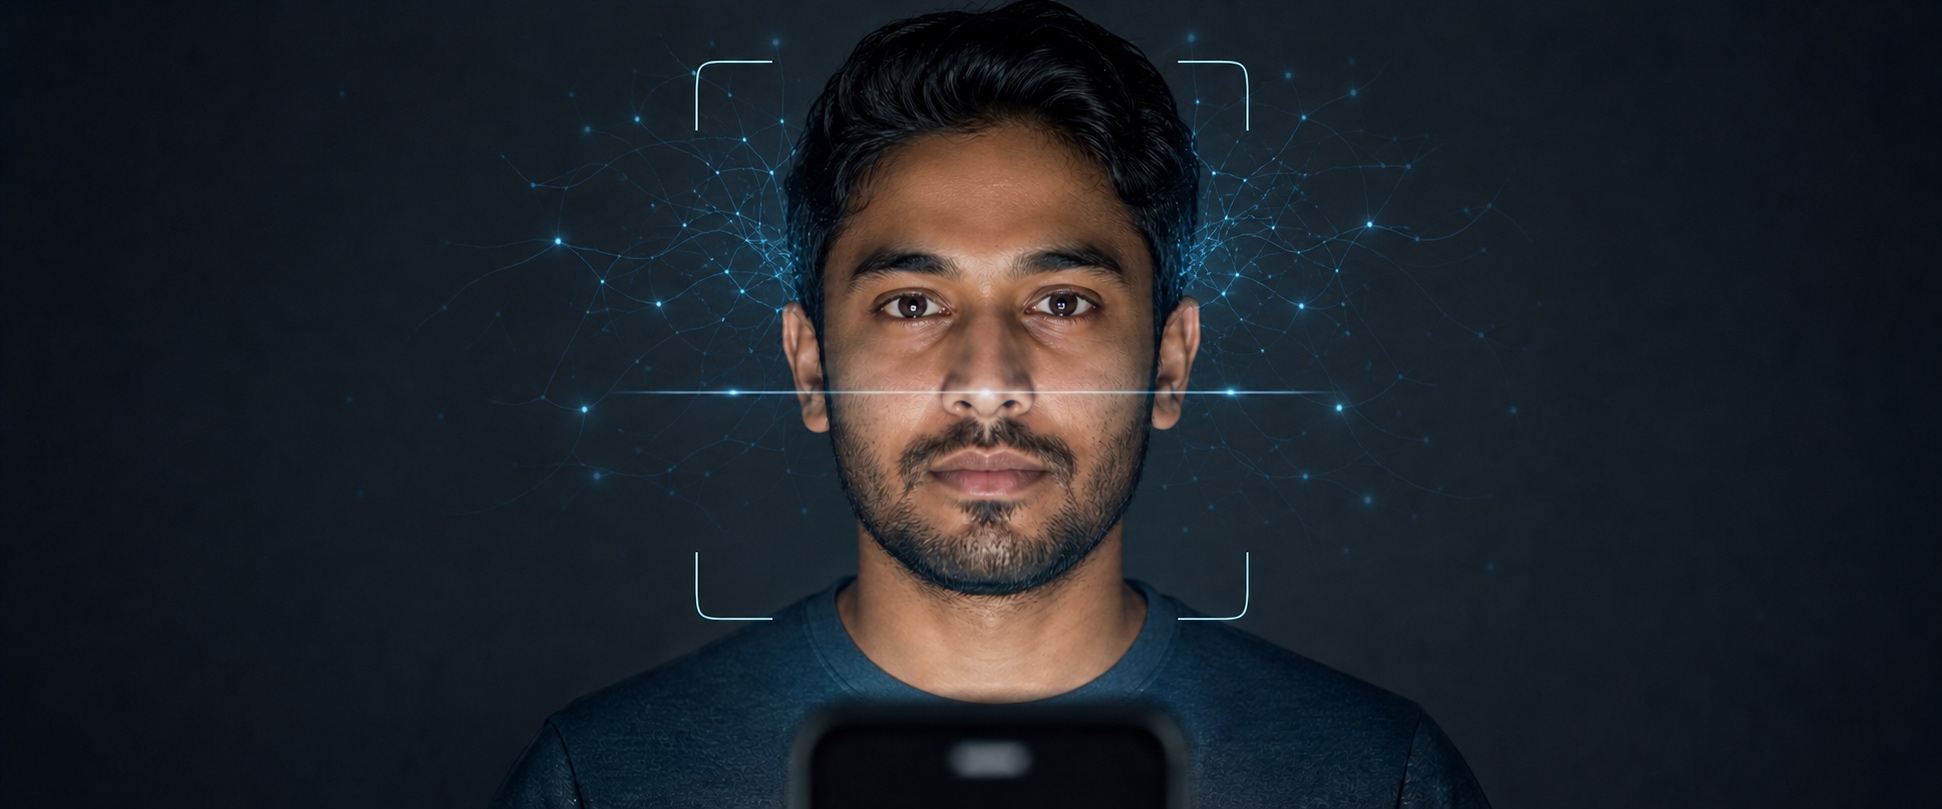
"We want the check-in stand to recognize attendees when they walk up to it. No badge and no QR code, just their face."
Requests like that one tend to arrive as a single sentence, and the sentence makes the feature sound simple. Before reading on, it is worth guessing how much machinery hides behind it, because most engineers guess a single model call and miss by a wide margin. What actually sits behind it is a real-time computer vision pipeline, where detection, tracking, alignment, embedding, matching, and anti-spoofing all have to finish in a few dozen milliseconds per frame, on hardware you do not control.
Computer vision is a subfield of artificial intelligence (AI) that equips machines with the ability to process, analyze and interpret visual inputs such as images and videos. It uses machine learning to help computers and other systems derive meaningful information from visual data. Source
Most of the time, pipelines like this are built with production-grade cameras, PCs, and the like, but today we will be building a similarly impressive CV pipeline as a mobile app, running on a phone with React Native.
Facial data is quite sensitive so it has to be protected at all costs. In this demo, everything will run on-device. Cloud face APIs exist, yes, but for event check-in, access control, and KYC products, on-device wins on every axis that matters - privacy most of all. The goal of this post is that you understand the pipeline well enough to build one yourself, or to evaluate one that someone wants to sell you.
The pipeline at a glance
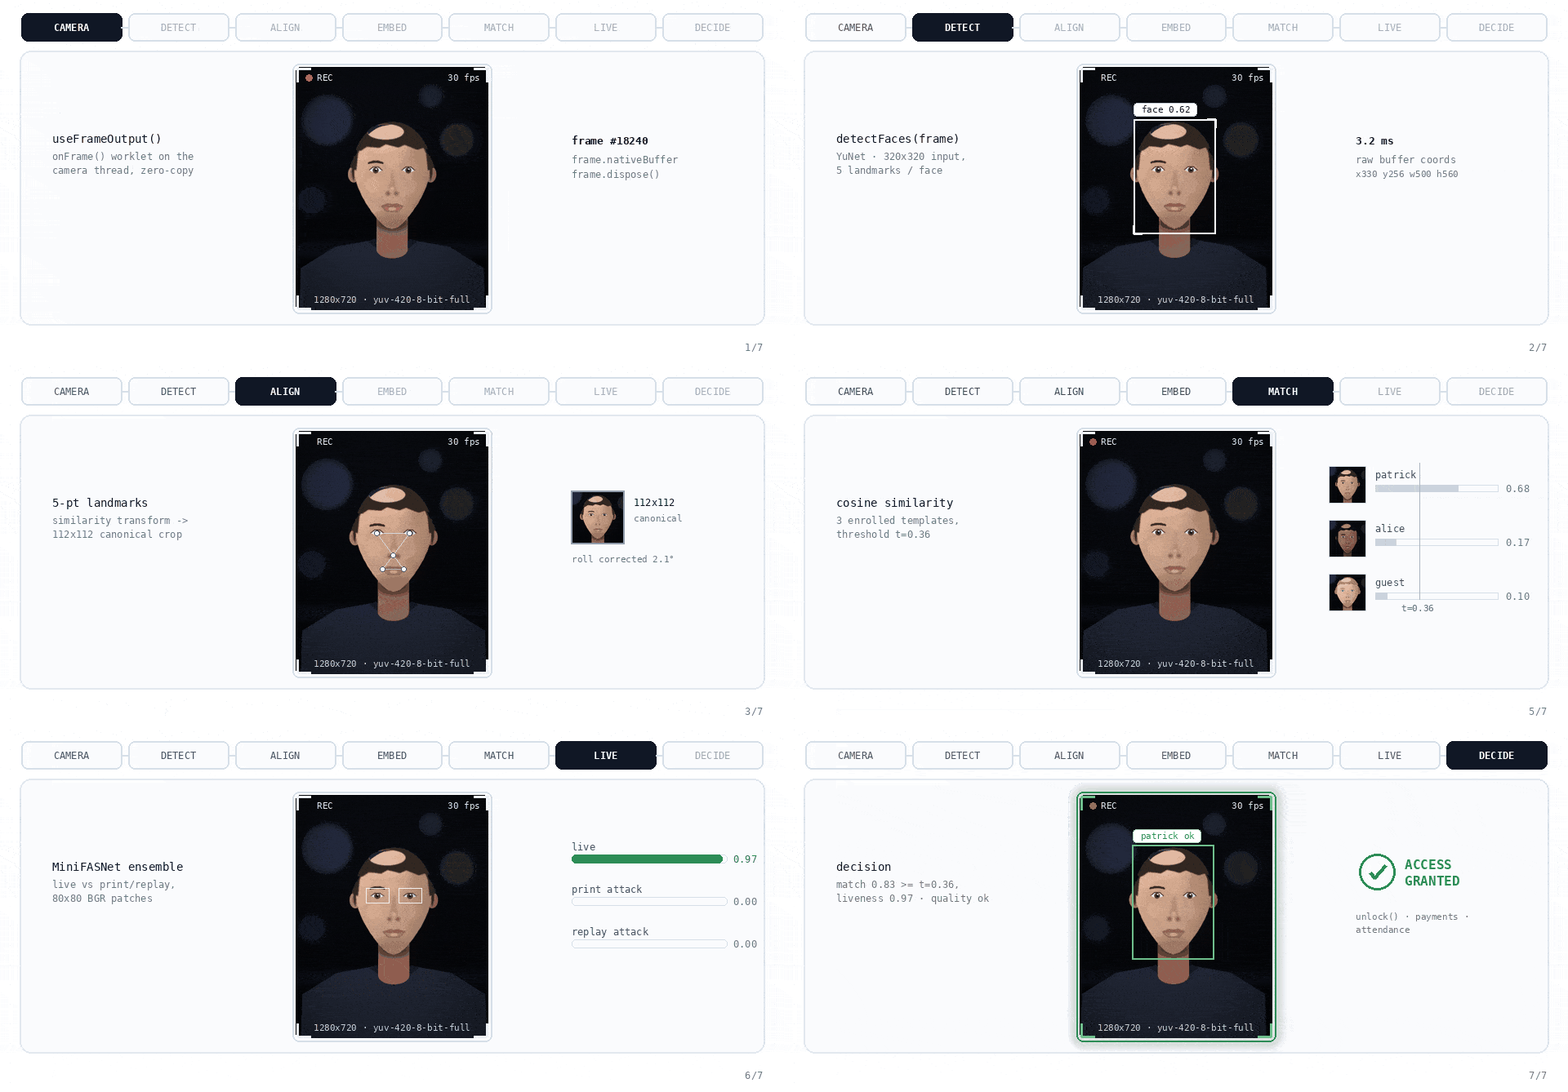
Face recognition is not one model. It is a relay race of small, specialized stages, where each stage solves exactly one problem and hands its output to the next. No stage on its own recognizes anyone; recognition only emerges from the full chain. The stages are also deliberately independent, each knowing almost nothing about the one after it, and that independence is what keeps the system easy to optimize, debug, and upgrade one piece at a time as better models become available.
The most common misconception in this space is that face detection and face recognition are the same problem. The confusion is understandable, because cloud APIs and library demos hide the entire pipeline behind a single function call. Detection asks whether there is a face, and that part is cheap and largely solved. Recognition asks whose face it is, and in the diagram it is stage five, with embedding describing the face as a vector and matching putting a name to that vector. It only works if every stage before it does its job, because a sloppy alignment step will quietly ruin a state-of-the-art recognition model.
Vectors are used to represent data in numerical form so that machine learning algorithms can process, analyze, and learn from it effectively. Source
The rest of this post walks the pipeline stage by stage. Okay, let's get into it!
Smile for the camera
We need a way to see the faces we'll be recognizing, and for that we will be using the device's native camera via react-native-vision-camera, the most powerful camera library for React Native, built by the margelo-avenger-in-chief, Marc Rousavy.
What makes real-time ML feasible is VisionCamera's frame output API (formerly known as frame processors). It hands your code each camera frame synchronously, on a dedicated native thread, as a worklet, with no bridge serialization and no copying of pixels into JavaScript.
In VisionCamera v5 you attach a frame output to the camera and receive frames in a worklet callback.
import { Camera, useCameraDevice, useFrameOutput } from 'react-native-vision-camera'

function FaceCamera() {
  const device = useCameraDevice('front')

  const frameOutput = useFrameOutput({
    targetResolution: { width: 640, height: 480 },
    pixelFormat: 'yuv',
    dropFramesWhileBusy: true,
    onFrame(frame) {
      'worklet'
      try {
        // the entire pipeline runs from here
      } finally {
        frame.dispose() // non-negotiable, see below
      }
    },
  })

  return <Camera device={device} isActive outputs={[frameOutput]} />
}
Three options in that snippet carry the performance budget.
Resolution. Your camera can do 4K, and nothing downstream wants it. Ask for something like 640×480 and let the camera downscale on the GPU. A 4K YUV frame is around 12 MB, which at 30 fps is 360 MB/s of memory traffic before you have computed anything.
Pixel format. YUV is the sensor's native output, so asking for 'rgb' forces a conversion on every frame whether you use it or not. Take the YUV planes and convert inside native code, only for the small crops you actually feed to models.
Backpressure. If your pipeline takes 40 ms and frames arrive every 33 ms, a queue grows forever and your preview lags seconds behind reality. Real-time vision has to be lossy: dropFramesWhileBusy keeps the newest frame and discards the rest.
And the rule that bites everyone once: every frame must be disposed. A frame is not an ordinary JavaScript object. It is a handle to one of a small, fixed pool of native buffers that the camera recycles, and the garbage collector will not release it for you in time. Hold on to a few and the pool fills, the pipeline stalls, and later frames are silently dropped. try/finally around the whole worklet body, always.
A raw frame is just pixels, and nothing in it is labeled face. The detector's job is to output bounding boxes, a confidence score, and, critically for later stages, facial landmarks. Pick a detector that gives you them for free, because you will need them for alignment.
A landmark is a point of interest within a face. The left eye, right eye, and base of the nose are all examples of landmarks. Source
These are the detector models worth knowing on mobile.
| Model | Size | Landmarks | Notes (timings on a Galaxy S21 Ultra class phone CPU) |
|---|---|---|---|
| YuNet | ~230 KB | 5 points (eye centers, nose tip, mouth corners) | Our default. 3 to 6 ms per frame at 128 input, landmarks map straight onto the ArcFace alignment template, MIT license |
| BlazeFace (MediaPipe, short-range) | ~224 KB | 6 points (eye centers, ear tragions, nose tip, mouth center) | 2.2 ms measured on LiteRT's CPU path, tuned for selfie distance, no mouth corners so ArcFace alignment needs an extra landmark model, Apache-2.0 |
| SCRFD (InsightFace) | 2.5 to 39 MB | 5 points on the KPS variants | The accuracy pick when small or crowded faces matter, several times faster than RetinaFace at the same accuracy, pretrained weights are research-only |
| RetinaFace (InsightFace) | 1.7 to ~105 MB | 5 points | The former accuracy benchmark, heavy for phones and largely superseded by SCRFD, pretrained weights are research-only |
The clear winner is YuNet, for its commercial-friendly license, its size, and landmarks that feed ArcFace alignment directly. We have not benchmarked SCRFD or RetinaFace on device, since the two small models have covered every product scenario so far. The research-only restriction on InsightFace weights is a trap we will come back to.
Whichever model you pick, two parameters do most of the tuning work.
Input size is the resolution your frame gets scaled to before the detector sees it. Detectors are resolution-flexible, and smaller means faster, so 128 is enough at check-in distance, with 224 or 320 held back for small or distant faces.
Score threshold is how confident the model has to be before you accept a box as a face. 0.6 to 0.7 suits most detectors, since too low chases phantom faces and too high makes the box flicker.
Where should this run? Not in JavaScript. The frame worklet should call straight into native code through a JSI or Nitro binding, where the model runs on ONNX Runtime or LiteRT against the YUV planes directly. YuNet's 3 to 6 ms is cheap, but not cheap enough to run thirty times a second alongside everything else, a bill we come back to once the rest of the pipeline exists.
Telling who is who
We know a face is there. We still have no idea whose it is.
Closing that gap is the whole of recognition, and it takes four moves: straighten the face so the model can read it, prove it belongs to a real person and not a photo, reduce it to a vector, and compare that vector against everyone you have enrolled.
Alignment quietly decides your accuracy
Recognition models are trained on faces warped to a canonical pose, a fixed 112 by 112 crop where the eyes, nose, and mouth land on predetermined coordinates. Feed one a raw bounding-box crop of an attendee glancing down at their phone, head tilted fifteen degrees, and accuracy does not degrade gracefully, it falls off a cliff.
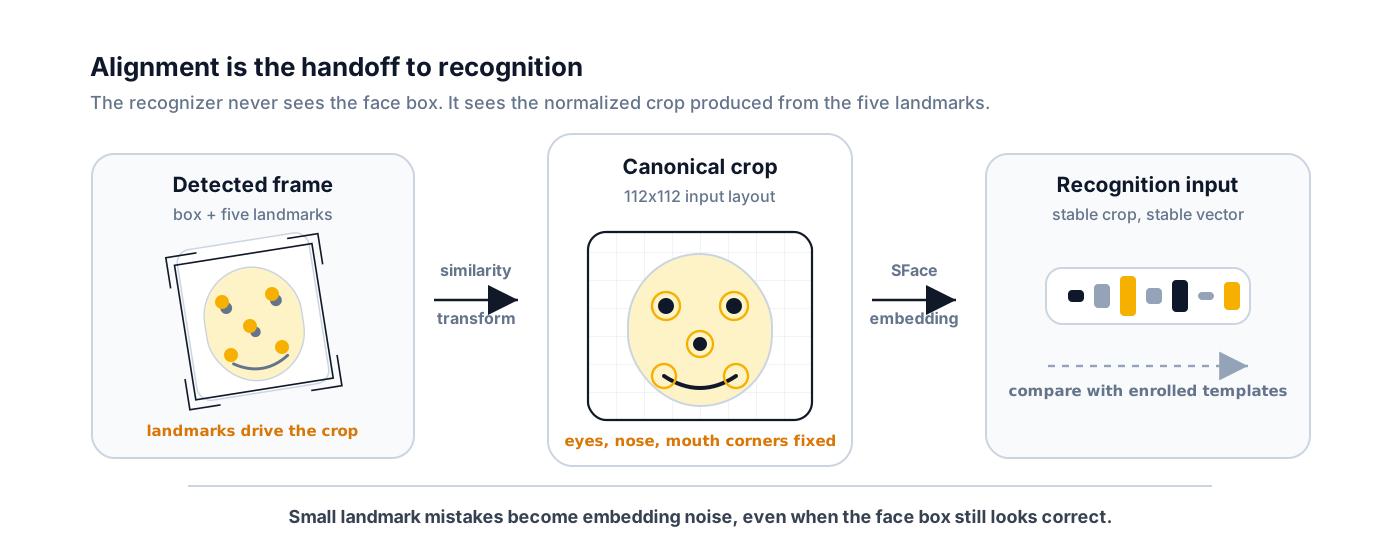
Alignment is the fix, and it is beautifully cheap. Take the five landmarks the detector already gave you and compute the similarity transform (rotation, uniform scale, and translation) that maps them onto the canonical template.
// Canonical 5-point template for 112×112 ArcFace-style crops
static const std::array<cv::Point2f, 5> kTemplate = {{
  {38.2946f, 51.6963f},  // left eye
  {73.5318f, 51.5014f},  // right eye
  {56.0252f, 71.7366f},  // nose tip
  {41.5493f, 92.3655f},  // left mouth corner
  {70.7299f, 92.2041f},  // right mouth corner
}};

cv::Mat M = estimateSimilarityTransform(detectedLandmarks, kTemplate);
cv::warpAffine(frameBgr, alignedFace, M, cv::Size(112, 112));
That is one 112 by 112 warp per face, it runs in well under a millisecond, and it is the highest-leverage code in the entire pipeline.
It is also home to the sneakiest bug we hit while building this. Front-camera buffers can arrive mirrored, and aligning a mirrored face against a non-mirrored template still produces a plausible-looking crop. But every face gets distorted the same systematic way, the embedding space compresses, and different people start matching each other. Those are false accepts, the worst failure mode for an access-control product, caused three stages upstream of where the symptom appears. The fix is a one-line flipped template for mirrored frames, but you only make it once you know to look for it.
We now have a clean, canonical face chip. Before spending our most expensive compute on it, one question is worth asking first, which is whether this face is even real.
Liveness stops a photo of your CEO from opening the door
Every recognition pipeline without anti-spoofing shares the same vulnerability. Hold up a printed photo, or another phone displaying one, and the system happily matches it. For a check-in product that means an attendee getting checked in without ever showing up, and for access control it is a headline waiting to happen.
There are two approaches, and they are often combined.
- Active liveness challenges the user to blink or turn their head. Robust, but it adds friction and its own UI flow, which suits high-stakes, one-shot verification such as KYC onboarding.
- Passive liveness runs a small classifier that detects the texture signatures of presentation attacks, such as screen moiré, print halftones, and paper glare. Zero friction for the user, which suits continuous scenarios like a walk-up check-in stand.
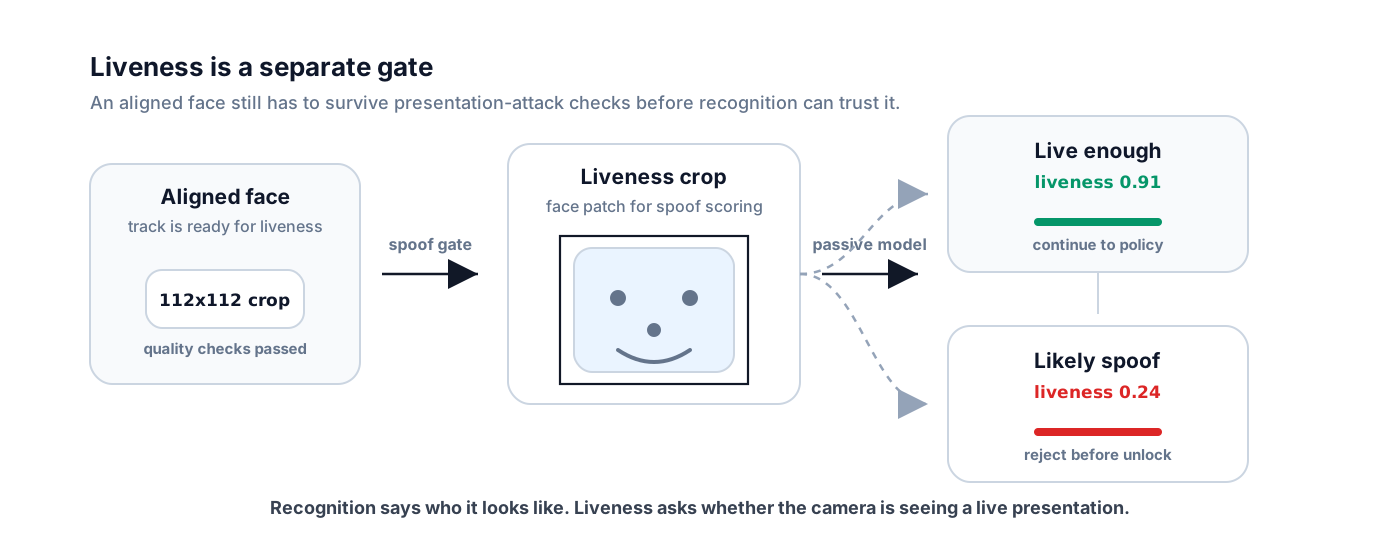
For passive liveness we use a MiniFASNet-style ensemble (from the Silent-Face-Anti-Spoofing lineage, Apache-2.0 licensed), two tiny CNNs over different crop scales at 80 by 80 whose outputs average into a live-versus-spoof probability. It costs a few milliseconds per face, and it does not have to run on every frame either. We run it as the last gate, only when matching has just produced an identity, since a face that matches nobody grants nothing worth spoofing, and the same check guards enrollment so a spoofed capture never enters the gallery.
That's it for liveness. So how do you compare two faces without storing photos of either one?
Embeddings turn a face into a vector
You do not compare images at all. A face recognition model maps any aligned face to a fixed-length vector called an embedding, trained so that vectors of the same person land close together and vectors of different people land far apart. Recognition stops being an image problem and becomes geometry.
These are the models we have worked with and benchmarked. In the accuracy column, LFW is the classic face-matching test that every modern model nearly aces, and IJB-C is a much harder test full of bad lighting and difficult angles, where models actually separate.
| Model | Size | Accuracy | Notes |
|---|---|---|---|
| SFace | 37 MB (19 MB quantized) | ~99.6% on LFW | Our default. Describes a face in 128 numbers, 29 ms per face on a Galaxy S21 Ultra, Apache-2.0 license so free for commercial use |
| ArcFace MobileFaceNet | 13 MB | 99.7% on LFW, 95.0% on IJB-C | Describes a face in 512 numbers, 25 ms per face on a Galaxy S21 Ultra, the best accuracy per megabyte, weights research-only |
| ArcFace ResNet-50 | 166 MB | 99.8% on LFW, 97.1% on IJB-C | Describes a face in 512 numbers, the accuracy ceiling but too heavy for most phones and we did not run it on device, weights research-only |
The license notes matter more than half a point of accuracy. InsightFace's pretrained weights are for non-commercial research only, and their MIT-licensed code does not change what the weights allow. Teams regularly benchmark with the best free weights, build around them, and discover at launch review that they cannot legally ship them. That is why SFace, with its Apache-2.0 release, is our shipping default.
The runtime matters as much as the model. Across ONNX Runtime, TFLite/LiteRT, and OpenCV DNN on the same device, ONNX Runtime on CPU with XNNPACK was consistently the fastest and most dependable. The GPU and NPU routes refused the models, ran no faster, or fell back silently. Ship with a provider probe and a CPU fallback. Quantizing to int8 also pays off, shrinking our SFace from 37 MB to 19 MB while speeding up CPU inference at a usually negligible accuracy cost.
After inference, L2-normalize the embedding so every vector lies on the unit sphere, and similarity between two faces collapses into a single dot product, their cosine similarity. At this point the attendee's face is a point on that sphere, 128 numbers waiting to be compared against something.
Enrollment and matching
An embedding by itself identifies no one, so you need a gallery to compare against, which means an enrollment flow. Building ours taught us three things worth passing on.
Enroll multiple samples per person. One reference photo means every future match is at the mercy of how that one photo was lit on the day they registered. We capture several templates per identity, with slight pose and lighting variation, and combine them into one representative centroid. This does more for real-world accuracy than swapping to a bigger model.
Enforce quality at enrollment time. Reject blurry, tiny, badly lit, or extreme-pose captures while you can still ask the user to try again. Caught at match time instead, a bad template silently causes misses for months.
Store embeddings, not photos. The gallery becomes a set of float vectors that cannot be reconstructed into a face in any practical sense, and your data-protection story improves enormously, since there is no photo library to leak and deleting a person means deleting a few kilobytes of vectors.
Matching starts as a brute-force loop over those precomputed centroids.
Match best{-1.0f, ""};
Match runnerUp{-1.0f, ""};
for (const auto& person : gallery) {
  Match candidate{dot(queryCentroid, person.centroid), person.id};
  if (candidate.score > best.score) {
    runnerUp = best;
    best = candidate;
  } else if (candidate.score > runnerUp.score) {
    runnerUp = candidate;
  }
}
const bool accepted = best.score >= threshold &&
                      best.score - runnerUp.score >= minimumMargin;
return accepted ? best : Match::none();
A 512-entry gallery costs microseconds, so you do not need a vector database on a phone. An approximate-nearest-neighbor index only starts earning its keep past roughly a hundred thousand templates.
The threshold in that last line is a product decision wearing an engineering costume. Every threshold trades false accepts against false rejects, and which error is worse depends on the product. A payment authorization raises it; a meetup check-in stays forgiving. The numbers transfer neither between models nor between environments, so collect a small evaluation set with the actual camera in the actual lighting, plot both error rates across thresholds, and choose the operating point knowingly.
Why five frames became one point
Our first implementation still made its decision from one new camera frame. That frame could catch the attendee looking down, blinking, moving, or standing under an awkward light. We had five enrollment images describing the person, but only one moment describing the person in front of the camera. The imbalance showed up as avoidable rejections.
So we let the camera collect five fresh face embeddings from the same tracked face. We never reuse an enrollment image as a test image. To turn five snapshots into one search, we average the embeddings and L2-normalize the result.
FaceEmbedding createCentroid(const std::vector<FaceEmbedding>& embeddings) {
  FaceEmbedding sum(embeddings.front().size(), 0.0f);
  for (const FaceEmbedding& embedding : embeddings)
    for (std::size_t i = 0; i < embedding.size(); ++i)
      sum[i] += embedding[i];
  return l2Normalize(sum);
}
That point is the centroid. The part of the embedding that consistently describes the identity reinforces itself, while noise caused by pose, expression, blur, and lighting tends to cancel out. The centroid's job is retrieval, narrowing the whole gallery to a shortlist of candidates in one cheap pass. The decision itself stays with the frames. Each of the five embeddings scores the shortlist independently, a frame only votes for an identity that clears both the similarity threshold and the lead over the runner-up, and a name is accepted when a majority of the frames agree on it. The similarity we report is the median of the winning scores, so one unusually high-scoring frame cannot carry the decision.
The next step was to test whether that neat explanation survived contact with data. We ran the native benchmark on a public face dataset with five distinct enrollment images per identity, disjoint test images, a similarity threshold of 0.50, and a minimum runner-up margin of 0.05. Tested counts registered identities.
The two failure columns are worth telling apart. An Unknown result means the system declined to name anybody, and the attendee simply tries again. A Wrong face means the system checked somebody in as somebody else, which is why it is tuned to prefer saying nothing over a wrong match.
| Gallery | Test frames | Tested | Accepted success | Unknown | Wrong face |
|---|---|---|---|---|---|
| 1,000 | 5 | 1,000 | 98.10% | 1.90% | 0.00% |
| 2,000 | 5 | 2,000 | 97.15% | 2.85% | 0.00% |
| 3,000 | 5 | 3,000 | 96.47% | 3.50% | 0.03% |
| 4,000 | 5 | 4,000 | 96.38% | 3.52% | 0.10% |
| 5,000 | 5 | 5,000 | 95.94% | 3.92% | 0.14% |
Five test frames hold accepted success above 95% all the way to a gallery of 5,000 people, with unknown results under 4% and wrong faces at 0.14%. That was the result we hoped for.
One caution before declaring victory at 95.94%. A centroid is an evidence resolver, not a safety policy. It makes recognition more consistent for everyone, including people who should remain unknown. We benchmarked at a deliberately forgiving 0.50 threshold to isolate the effect of the extra frames, and shipping means calibrating the threshold and margin against representative outsiders and real camera conditions, exactly as you would for any single-frame system. The experiment settled the architecture, and the product's acceptable wrong-face rate picks its operating point.
The pipeline is now complete, taking a frame in and producing an identity out. But it runs on a background thread, and your UI knows nothing about it yet.
Getting results back to the JS runtime
Everything above runs inside the frame worklet, on VisionCamera's capture thread or an async-runner runtime, while your React components live on the JS thread. The gap between those two worlds is where we spent more debugging time than anywhere else in the project.
The straightforward path is Reanimated shared values, which worklets in VisionCamera v5 can write directly, driving overlay animations without ever touching the JS thread.
const faces = useSharedValue<FaceBox[]>([])

const frameOutput = useFrameOutput({
  onFrame(frame) {
    'worklet'
    try {
      faces.set(recognizer.recognizeFaces(frame))
    } finally {
      frame.dispose()
    }
  },
})
Coordinates are their own trap in this handoff. The pipeline reports boxes in raw camera buffer pixels, while your overlay draws in view space, rotated, mirrored, and cropped by resizeMode="cover". Use VisionCamera's conversion pair (frame.convertFramePointToCameraPoint, then previewView.convertCameraPointToViewPoint) rather than hand-rolling orientation math, and test all four rotations on both cameras. Get it wrong and the box floats near the attendee rather than on them.
The pipeline is correct now. What we still owe is the bill from detection: running all of this thirty times a second.
Not every frame needs the whole pipeline
We discovered this stage the hard way, when running detection on every frame proved too slow to hold 30 fps. The insight is that detection re-finds faces from scratch at model-inference prices, while between two consecutive frames a face barely moves. The attendee's face shifts by a few pixels per frame, not across the screen. You do not need to re-find them, you just need to follow them.
So the production pattern is to run the detector every N frames (10 is our default), and a cheap tracker on the frames in between, using intersection-over-union (IoU) against a local search. When a detection frame arrives, the two reconcile: new faces get tracks, and tracks that have gone unmatched are retired.
Intersection over Union (IoU), also known as the Jaccard index, is the most popular evaluation metric for tasks such as segmentation, object detection and tracking. Source
We use it not to score a model, but to ask whether two boxes are the same face.
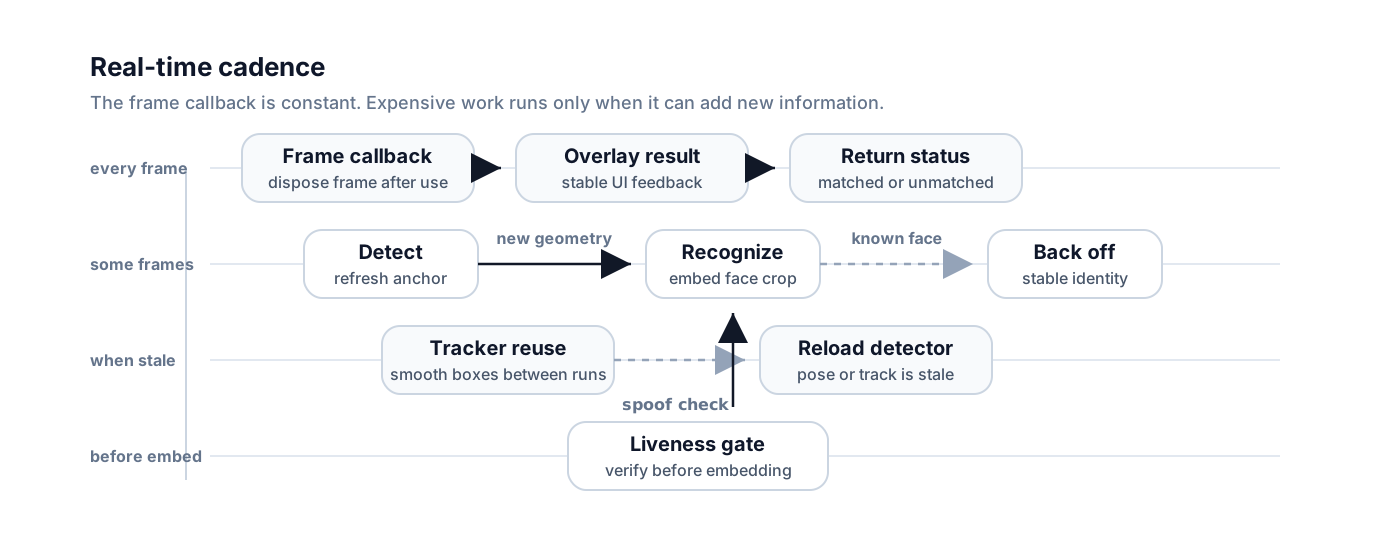
Tracking buys you three things beyond raw speed.
- Stable identity across frames. Each track gets an ID, so face number three means the same physical person from frame to frame, the anchor everything downstream hangs its state on.
- Recognition scheduling. Recognition is the most expensive stage, and with stable tracks you recognize once, cache, and re-verify periodically. Our defaults re-check unmatched faces every 10 frames and matched ones every 45, an order of magnitude less recognition work with zero perceived difference.
- A smooth UI. Detector output jitters by a few pixels per frame, so draw the track state, lightly smoothed, unless you enjoy watching your overlay box vibrate.
One frame, end to end
Time to tie everything together. Take a React Native meetup running face check-in with 140 enrolled attendees, an attendee named Amara walking up to the check-in phone, and a frame that lands on the detection interval carrying the fifth embedding her recognition decision has been waiting for. The embedding cost is measured from our Galaxy S21 Ultra benchmarks on ONNX Runtime's single-threaded CPU provider, and the smaller stage costs are estimates for that class of phone.
| Stage | Cost | What happens |
|---|---|---|
| Schedule check | ~0.1 ms | This frame lands on the detection interval, and the track's recognition cooldown has expired, so recognition may run too |
| Detection | ~5 ms | YuNet reads the YUV planes in place at 128 input and finds one face, confidence 0.94, with five landmarks |
| Track update | ~0.1 ms | The detection lands a few pixels from the track's last box, well inside the association limit, so it is the same face and its state carries over |
| Quality gate | ~0 ms | The face is 118 px and near-frontal, above the 56 px recognition minimum, so the pipeline proceeds |
| Alignment | ~0.5 ms | The landmarks warp the face onto the mirrored 112 by 112 template, mirrored because this is a front camera |
| Embedding | ~29 ms | SFace turns the aligned crop into a 128-number vector, the measured single-thread cost on this phone |
| Matching | ~0.2 ms | Centroid comparisons across 140 attendees shortlist the gallery, the five embeddings vote, and Amara wins every vote, median score 0.81 against the 0.70 threshold, runner-up 0.31 |
| Liveness | ~4 ms | The match is about to be accepted, so two MiniFASNet crops check it, averaging 0.91 live probability, a real face and not a phone screen |
| Publish | ~0 ms | The latest result is published for the UI and the frame is disposed |
The total lands around 39 ms, overshooting the 33 ms frame interval, and that is fine by design. The camera drops the one frame that arrived while the worklet was busy, the tracker catches up on the next, and nobody can tell. On the JS thread, the UI picks up the new result, converts the raw box to view coordinates, re-renders once with a green box reading Amara, 0.81, and the debounced check-in handler records exactly one arrival. The next nine frames cost a fraction of a millisecond each, because detection and recognition do not run at all. That rhythm, one expensive frame followed by nine nearly free ones, is the relay race from the top of the post run in full, finished before Amara has even focused on the screen.
Making it survive the real world
The walkthrough above is the happy path on a warm phone. Each of the following came out of profiling our own implementation on physical devices.
Profile release builds, on real devices, with real profilers. Debug builds of React Native are so much slower that any measurement on one is noise. In our release profiles the JS and UI threads sat nearly idle and the frame pipeline was the only hot path, which is the goal. Perfetto on Android, Instruments on iOS.
Not all jank is CPU. We once spent a couple of hours chasing 28 percent janky frames on a Galaxy S21 while the profiler insisted the pipeline was fast. The cause was the adaptive refresh display oscillating around 48 Hz against a 30 fps camera feed, and the beat pattern read as jank. Locking the display to 60 Hz dropped jank to 1.5 percent without touching pipeline code. Diagnose before you optimize.
Watch native memory. An fp32 recognition model can hold 250 to 300 MB of native heap, invisible to JS heap tools and very visible to Android's low-memory killer. On tight-memory targets, quantized int8 models are a requirement, not an optimization.
Test model loading in release builds. Android debug and release builds can resolve bundled model files through different mechanisms, so a model that loads in debug proves nothing about release. We learned this from a release build that could not find its own models.
Plan for thermals and the low end. Ten minutes of continuous 30 fps inference will thermally throttle mid-range hardware. Drop the frame rate when no face has been seen for a while, widen detection intervals under load, and re-measure on the cheapest device you claim to support.
What it takes, and where to start
The individual pieces of on-device face recognition are all tractable, with open models, mature runtimes, and a camera library purpose-built for the job. What makes it a specialist project is the integration: the mirrored-template bug that shows up as false accepts three stages downstream, the threading model that deadlocks only under load, the threshold that is right for a meetup check-in and wrong for a payment, and the jank that was never CPU in the first place. Every one of these is cheap to avoid if you have seen it before and expensive to discover if you have not.
We have already built everything described in this post, covering the VisionCamera 5 frame pipeline, a C++ ONNX Runtime engine, YuNet detection and SFace embeddings, tracking, multi-sample enrollment, passive liveness, and the worklet-to-UI bridge, and we have benchmarked it across runtimes, providers, and real devices along the way. The face recognition app is on GitHub, so you can clone it and try all of this for yourself:
Which brings us back to the check-in stand. The attendee walks up, and a few dozen milliseconds later, a green box greets them by name, with no badge, no QR code, and no photo ever leaving the phone. The feature request that arrived as a single sentence turned out to hide a relay race, and now you know every leg of it.
So if you are building a product on top of this, whether event check-in, access control, KYC, or membership verification, this is exactly the kind of system we can design and build with you, from model selection and threshold calibration on your real data through to release-build profiling on the devices your users actually own. Get in touch and tell us what you are building.